
In this tutorial, I’ll guide you through installing Tailwind CSS with DaisyUI in Vue 3. Before we begin, we’ll need to install Tailwind CSS in Vue 3. Then, we’ll proceed to install the DaisyUI plugin. Let’s get started!
Install Vue 3 with Vite
Choose the option below to install Vue 3 with Vite.
With NPM:
npm create vite@latestWith Yarn:
yarn create viteWith PNPM:
pnpm create viteNow, select the Vue project option.
√ Project name: ... vue-daisyui
? Select a framework: » - Use arrow-keys. Return to submit.
  Vanilla
>  Vue
  React
  Preact
  Lit
  Svelte
  Others
Choose between TypeScript or JavaScript.
√ Project name: ... vue-daisyui
√ Select a framework: » Vue
? Select a variant: » - Use arrow-keys. Return to submit.
  JavaScript
>  TypeScript
  Customize with create-vue ↗
  Nuxt ↗
Navigate to your project directory and install the required dependencies. Then, proceed to run the project.
cd vue-daisyui
npm install
npm run dev
Install Tailwind CSS in Vue 3
To install Tailwind CSS in Vue 3, you have two options: you can either refer to the Tailwind official documentation or follow the steps below.
Install Tailwind CSS by running the following command:
npm install -D tailwindcss postcss autoprefixer
npx tailwindcss init -p
Add the Vue 3 template path to your tailwind.config.cjs file. Here’s how you can do it:
/** @type {import('tailwindcss').Config} */
module.exports = {
 content: [
  "./index.html",
  "./src/**/*.{vue,js,ts,jsx,tsx}",
 ],
 theme: {
  extend: {},
 },
 plugins: [],
}
Next, remove all CSS classes in your style.css file and replace them with Tailwind directives. Here’s how you can do it:
@tailwind base;
@tailwind components;
@tailwind utilities;
Make sure to include these directives at the top of your style.css file.
Install Daisyui Plugin in Vue 3
To install the DaisyUI plugin, run the following command:
npm i daisyuiThen, add DaisyUI to your tailwind.config.cjs file. Here’s how you can do it:
/** @type {import('tailwindcss').Config} */
module.exports = {
  content: [
    "./index.html",
    "./src/**/*.{vue,js,ts,jsx,tsx}",
  ],
  theme: {
    extend: {},
  },
  plugins: [require("daisyui")],
}
Now, test DaisyUI code in your Vue 3 project to see if it’s working properly.
src/App.vue
<template>
  <div class="flex justify-center items-center h-screen">
    <div class="space-x-4">
      <h1 class="text-3xl mb-4 text-purple-500">
        How to Install Tailwind Daisyui In Vue 3
      </h1>
      <button class="btn">Button</button>
      <button class="btn btn-primary">Button</button>
      <button class="btn btn-secondary">Button</button>
      <button class="btn btn-accent">Button</button>
      <button class="btn btn-ghost">Button</button>
      <button class="btn btn-link">Button</button>
    </div>
  </div>
</template>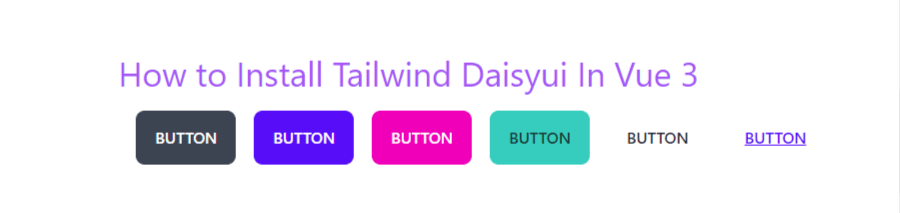
Javed sheikh

Hello there! I’m Javed Sheikh, a frontend developer with a passion for crafting seamless user experiences. With expertise in JavaScript frameworks like Vue.js, Svelte, and React, I bring creativity and innovation to every project I undertake. From building dynamic web applications to optimizing user interfaces,

