
In this tutorial, we’ll create building a drag-and-drop image file upload using Bootstrap 5. You’ll learn how to implement drag-and-drop functionality with image previews and leverage the Dropzone library to enhance your file uploading experience.
How to use Bootstrap 5 Upload Image with Preview
Starting Bootstrap 5 Structure with CDN
<!doctype html>
<html lang="en">
  <head>
    <meta charset="utf-8">
    <meta name="viewport" content="width=device-width, initial-scale=1">
    <title>Bootstrap 5 Drag & Drop </title>
    <link href="https://cdn.jsdelivr.net/npm/bootstrap@5.2.3/dist/css/bootstrap.min.css" rel="stylesheet" integrity="sha384-rbsA2VBKQhggwzxH7pPCaAqO46MgnOM80zW1RWuH61DGLwZJEdK2Kadq2F9CUG65" crossorigin="anonymous">
  </head>
  <body>
    <script src="https://cdn.jsdelivr.net/npm/bootstrap@5.2.3/dist/js/bootstrap.bundle.min.js" integrity="sha384-kenU1KFdBIe4zVF0s0G1M5b4hcpxyD9F7jL+jjXkk+Q2h455rYXK/7HAuoJl+0I4" crossorigin="anonymous"></script>
  </body>
</html>
Add Bootstrap 5 Icon CDN
<link rel="stylesheet" href="https://cdn.jsdelivr.net/npm/bootstrap-icons@1.11.1/font/bootstrap-icons.css">Create a Bootstrap 5 Drag and Drop Image File Upload UI with Bootstrap 5 Icons.
<div class="container mt-5">
    <div class="card">
        <div class="card-body">
            <div id="drop-area" class="border rounded d-flex justify-content-center align-items-center"
                style="height: 200px; cursor: pointer;">
                <div class="text-center">
                    <i class="bi bi-cloud-arrow-up-fill text-primary" style="font-size: 48px;"></i>
                    <p class="mt-3">Drag and drop your image here or click to select a file.</p>
                </div>
            </div>
            <input type="file" id="fileElem" multiple accept="image/*" class="d-none">
        </div>
    </div>
</div>
Now Add JavaScript code.
<script>
  let dropArea = document.getElementById("drop-area");

  ["dragenter", "dragover", "dragleave", "drop"].forEach((eventName) => {
    dropArea.addEventListener(eventName, preventDefaults, false);
    document.body.addEventListener(eventName, preventDefaults, false);
  });

  ["dragenter", "dragover"].forEach((eventName) => {
    dropArea.addEventListener(eventName, highlight, false);
  });

  ["dragleave", "drop"].forEach((eventName) => {
    dropArea.addEventListener(eventName, unhighlight, false);
  });

  dropArea.addEventListener("drop", handleDrop, false);

  function preventDefaults(e) {
    e.preventDefault();
    e.stopPropagation();
  }

  function highlight(e) {
    dropArea.classList.add("highlight");
  }

  function unhighlight(e) {
    dropArea.classList.remove("highlight");
  }

  function handleDrop(e) {
    let dt = e.dataTransfer;
    let files = dt.files;
    handleFiles(files);
  }

  function handleFiles(files) {
    [...files].forEach(uploadFile);
  }

  function uploadFile(file) {
    console.log("Uploading", file.name);
  }

  dropArea.addEventListener("click", () => {
    fileElem.click();
  });

  let fileElem = document.getElementById("fileElem");
  fileElem.addEventListener("change", function (e) {
    handleFiles(this.files);
  });
</script>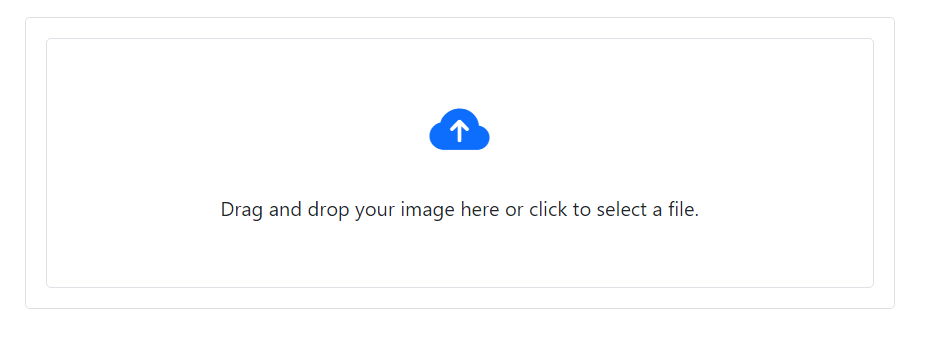
Bootstrap 5 Drag and Drop Image File Upload with Preview
To display an image preview once the user selects or drops an image, you’ll need to update the JavaScript to read the file and display it using a FileReader.
<div class="container mt-5">
  <div class="card">
    <div class="card-body">
      <div id="drop-area" class="border rounded d-flex justify-content-center align-items-center"
        style="height: 200px; cursor: pointer">
        <div class="text-center">
          <i class="bi bi-cloud-arrow-up-fill text-primary" style="font-size: 48px"></i>
          <p class="mt-3">
            Drag and drop your image here or click to select a file.
          </p>
        </div>
      </div>
      <input type="file" id="fileElem" multiple accept="image/*" class="d-none" />
      <div id="gallery"></div>
    </div>
  </div>
</div>
Now Add JavaScript code.
<script>
  let dropArea = document.getElementById('drop-area');
  let fileElem = document.getElementById('fileElem');
  let gallery = document.getElementById('gallery');

  ['dragenter', 'dragover', 'dragleave', 'drop'].forEach(eventName => {
    dropArea.addEventListener(eventName, preventDefaults, false);
    document.body.addEventListener(eventName, preventDefaults, false);
  });

  ['dragenter', 'dragover'].forEach(eventName => {
    dropArea.addEventListener(eventName, highlight, false);
  });

  ['dragleave', 'drop'].forEach(eventName => {
    dropArea.addEventListener(eventName, unhighlight, false);
  });

  dropArea.addEventListener('drop', handleDrop, false);

  function preventDefaults(e) {
    e.preventDefault();
    e.stopPropagation();
  }

  function highlight(e) {
    dropArea.classList.add('highlight');
  }

  function unhighlight(e) {
    dropArea.classList.remove('highlight');
  }

  function handleDrop(e) {
    let dt = e.dataTransfer;
    let files = dt.files;
    handleFiles(files);
  }

  dropArea.addEventListener('click', () => {
    fileElem.click();
  });

  fileElem.addEventListener('change', function (e) {
    handleFiles(this.files);
  });

  function handleFiles(files) {
    files = [...files];
    files.forEach(previewFile);
  }

  function previewFile(file) {
    let reader = new FileReader();
    reader.readAsDataURL(file);
    reader.onloadend = function () {
      let img = document.createElement('img');
      img.src = reader.result;
      gallery.appendChild(img);
    }
  }
</script>
Bootstrap 5 Dropzone Image File Upload
Create a Bootstrap 5 Drag and Drop Image File Upload Using Dropzone. Dropzone is a JavaScript library that turns any HTML element into a dropzone. This means that a user can drag and drop a file onto it, and Dropzone will display file previews and upload progress, and handle the upload for you via XHR.
Add Dropzone CDN
<link rel="stylesheet" href="https://unpkg.com/dropzone@5/dist/min/dropzone.min.css" />
<script src="https://unpkg.com/dropzone@5/dist/min/dropzone.min.js"></script><div class="container py-5">
<div class="row">
<div class="col-md-6 offset-md-3">
<form action="/file/post" class="dropzone dz-clickable border rounded bg-light p-3">
<div class="dz-default dz-message text-center">
<i class="bi bi-cloud-arrow-up" style="font-size: 2rem;"></i>
<div class="mt-3">Drop files here or click to upload.</div>
</div>
</form>
</div>
</div>
</div>Now Add Dropzone code.
<script>
  Dropzone.autoDiscover = false;

  // Dropzone configuration
  var myDropzone = new Dropzone(".dropzone", {
      url: "/file/post",
      paramName: "file",
      maxFilesize: 2, // MB
      maxFiles: 10,
      acceptedFiles: 'image/*',
      dictDefaultMessage: "Drag files here or click to upload.",
      clickable: true
  });
</script>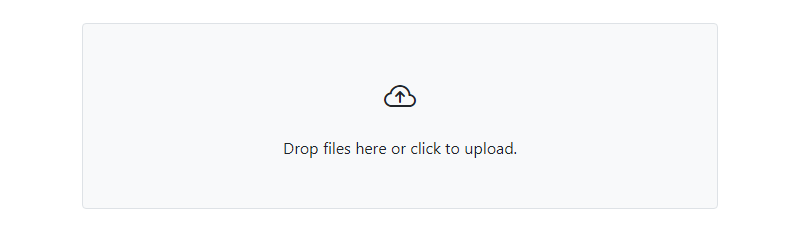
Javed sheikh

Hello there! I’m Javed Sheikh, a frontend developer with a passion for crafting seamless user experiences. With expertise in JavaScript frameworks like Vue.js, Svelte, and React, I bring creativity and innovation to every project I undertake. From building dynamic web applications to optimizing user interfaces,

