
In this tutorial, we will create a ChatGPT Page UI using Vuetify.js 3 in Vue.js 3. Before we begin, you need to install and configure Vuetify 3 in Vue 3.
How to Install Vuetify 3 in Vue 3
Vuetify 3 Vue 3 ChatGPT Page UI Example
1. Vue 3 Vuetify 3 basic ChatGPT UI using the options API.
Vue
<template>
  <v-app>
    <!-- Navigation Drawer for Chat Sessions -->
    <v-navigation-drawer app permanent>
      <v-list dense nav>
        <!-- Loop through chat sessions and display them here -->
        <v-list-item v-for="(item, index) in items" :key="index" link>
          <v-list-item-content>
            <v-list-item-title>{{ item.title }}</v-list-item-title>
          </v-list-item-content>
        </v-list-item>
      </v-list>
    </v-navigation-drawer>

    <!-- Main Content Area -->
    <v-main>
      <v-container>
        <!-- Chat Message Display Area -->
        <v-card class="pa-4 mb-4" height="500">
          <v-virtual-scroll :items="messages">
            <template v-slot="{ item, index }">
              <div class="my-2" :key="index">
                <v-chip class="ma-2" :color="item.user === 'me' ? 'blue' : 'green'" dark>
                  {{ item.message }}
                </v-chip>
              </div>
            </template>
          </v-virtual-scroll>
        </v-card>

        <!-- Message Input Area -->
        <v-row>
          <v-col cols="12">
            <v-text-field
              label="Type your message here..."
              v-model="newMessage"
              append-icon="mdi-send"
              @click:append="sendMessage"
              @keyup.enter="sendMessage"
            ></v-text-field>
          </v-col>
        </v-row>
      </v-container>
    </v-main>
  </v-app>
</template>

<script>
export default {
  data() {
    return {
      items: [
        { title: 'Previous Conversation 1' },
        { title: 'Previous Conversation 2' },
        // Add more chat sessions as needed
      ],
      messages: [
        { user: 'me', message: 'Hello, how can I help you?' },
        { user: 'you', message: 'I have a question about Vue.' },
        // Add more messages as needed
      ],
      newMessage: ''
    };
  },
  methods: {
    sendMessage() {
      if (this.newMessage.trim()) {
        this.messages.push({ user: 'me', message: this.newMessage });
        this.newMessage = '';
      }
    }
  }
};
</script>
2. Vue 3 with Vuetify 3 ChatGPT UI using Composition API.
Vue
<script setup>
import { ref } from 'vue';

const items = ref([
  { title: 'Chat Message 1' },
  { title: 'Chat Message 2' },
  { title: 'Chat Message 3' },
  // Add other items here
]);

const newMessage = ref('');

function sendMessage() {
  console.log('Message sent:', newMessage.value);
  newMessage.value = '';
}
</script>


<template>
  <v-app class="app-background">
    <!-- Sidebar -->
    <v-navigation-drawer permanent class="sidebar-color">
      <v-list dense class="py-0">
        <v-subheader>Today</v-subheader>
        <v-list-item-group>
          <v-list-item v-for="item in items" :key="item.title">
            <v-list-item-content>
              <v-list-item-title>{{ item.title }}</v-list-item-title>
            </v-list-item-content>
          </v-list-item>
        </v-list-item-group>
      </v-list>
    </v-navigation-drawer>

    <!-- Main Chat Area -->
    <v-main>
      <v-container>
        <v-card tile flat class="chat-window">
          <v-card-title class="text-h5 grey lighten-2">ChatGPT Conversation</v-card-title>
          <v-card-text class="chat-content">
            <v-row class="fill-height">
              <v-col>
                <!-- Chat messages go here -->
              </v-col>
            </v-row>
          </v-card-text>
          <v-card-actions class="pa-4">
            <v-text-field v-model="newMessage" label="Type a message" solo flat hide-details class="flex-grow-1"
              @keyup.enter="sendMessage"></v-text-field>
            <v-btn color="primary" @click="sendMessage">Send</v-btn>
          </v-card-actions>
        </v-card>
      </v-container>
    </v-main>
  </v-app>
</template>


<style scoped>
.app-background {
  background-color: #f5f5f5;
}

.sidebar-color {
  color: #ffffff;
  background-color: #333333;
}

.chat-window {
  max-height: calc(100vh - 96px);
  overflow-y: auto;
}

.chat-content {
  background-color: #ffffff;
  height: 500px;
}
</style>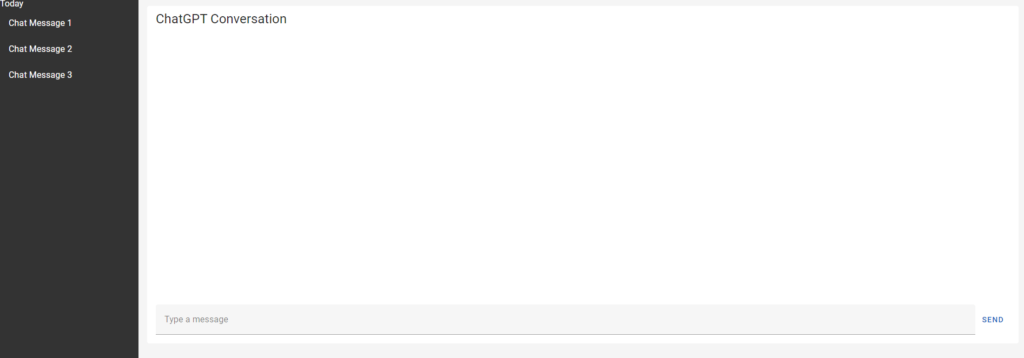
Javed sheikh

Hello there! I’m Javed Sheikh, a frontend developer with a passion for crafting seamless user experiences. With expertise in JavaScript frameworks like Vue.js, Svelte, and React, I bring creativity and innovation to every project I undertake. From building dynamic web applications to optimizing user interfaces,

